Scrappy Flying Geese Tutorial. Here is the tutorial I promised for the scrappy flying geese blocks. They are so much fun to make and add interest and a scrappy look to a traditional favorite!
You will need:
solid fabric for the base of your blocks ( I suggest a lighter color)
contrasting strips ( I will give you the cutting instructions as we go along....)

Begin by cutting your solid base pieces. for my sample I am cutting 2 1/2 inch high by 4 1/2 inch wide base blocks. This will be the size you will use in making a finished 12 inch block.

Now cut your strips. for this block cut strips 3/4 inch wide. cut an assortment of strips to make your blocks as scrappy as possible. Cut a few strips that are 1 1/4 inch wide. You will use these to finish your corners and eliminate bulky seams close to the corners of the block. These strips can be short. You can even use small scraps to fill this last section.

Prepare your base block. I have drawn a line down the center to make it easier to see, but you will just be pressing this line in place with your iron for reference when you are making your other lines. Mark a line 1/4 inch from the long edge on one side of the rectangle. Now mark 45 degree lines from the corner, intersecting the 1/4 inch line in the center. Mark this 45 degree line from both corners as shown. I have used a black pen so you can see it, but you will want to use just a light pencil or disappearing marker.

I put my block on top of a light box so you can see what I am doing. My block has the side with the lines drawn on it up and facing me. the strip is on the opposite side of the block. this is where the paper piecing technique comes into play. Pretend that the fabric block is your paper. I have lined up my fabric strip 1/4 inch from my drawn line. It was really quite easy to line up just by holding my block up to the light and holding the strip into place. It is also easy to see from the top side shere the strip's 1/4 seamline will line up with my line at the ends and corners of the block. The right side of my fabric strip is facing the underside of my block (right sides together). I will be stitching from the wrong side (side with lines marked on it) of the block. You will stitch along your marked line. turn the block over and press the strip toward the corner.

We are looking at the block on a lightbox again so you can see the fabric strips on the underside of my block. You can see that the first strip has been stitched and pressed up. Now you will do the alternating row on the other side of the block in the same way. You can see where it has been stitched along the other 45 degree line. When you have it stitched you will turn it over, press the seam towards the corner.

OK....the paper piecing part is complete. Now you will begin doing your fun strip piecing! Simply lay your strips right sides together as shown in this photo. Stitch a 1/4 inch seam. Press towards the corner and continue in the same way with the alternating row on the other side! Just like a strip pieced block!

Your blocks will look like this after your first two rows! For this size block you will do 3 rows with the 3/4 inch strips and use the wider strips for your final fourth row (to fill the corners).

Now you have a wonderful stake of fun scrappy blocks! Now we will prepare them for the final block design!

Turn your block over to the wrong side and trim all excess strip pieces away with your rotary cutter and ruler. Be sure to straighten up your side and long edges. Trim your block to a nice finished 2 1/2 inch by 4 1/2 inch block.

The block on the right is the way your finished block should look. The block on the left is WRONG. The block on the right as you can see has the strips overlapping, giving you a 1/4 "V" from the edge. This will give you a perfect flying geese block when your seams are sewn. If your block looks like the one on the left, you will not have a nice "V" when it is finished.

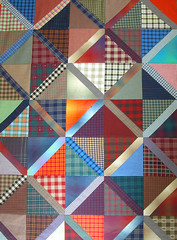
Now you will use your blocks in the selected design. This is how I laid out my finished 12 inch block! This block was made for the Quilt Dreams quilting Bee for Julie. I can't wait to make a full quilt with these scrappy Flying Geese!